Projecting on uneven walls can be a challenging task for AV professionals, home theater enthusiasts, and corporate IT teams. Uneven surfaces, textured walls, or irregular shapes often distort images, reduce clarity, and affect the overall viewing experience. Achieving a crisp, aligned projection in such conditions requires careful planning, the right equipment, and advanced tools to compensate for wall imperfections.
In this blog, we will explore the challenges of projecting on uneven walls, methods to achieve clear projection, and how professional solutions like XTEN-AV can simplify the process.
Understanding the Challenge
Uneven walls cause distortions in projected images because projectors are designed to project onto flat surfaces. When light hits a wall with bumps, textures, or irregularities, it scatters unevenly. This can result in:
Blurred or distorted edges
Uneven brightness and contrast
Trapezoidal or keystone distortion
Misalignment in multi-projector setups
These issues are compounded in larger spaces, curved walls, or DIY projection setups where walls may not have a uniform finish.
Key Factors Affecting Projection Clarity on Uneven Walls
Wall Surface Texture
Rough textures, brick patterns, or uneven plaster can scatter light and reduce image sharpness. Smooth, matte surfaces work best for clear projection.Throw Distance
Incorrect throw distance can magnify distortions caused by wall irregularities. Proper calculation of throw distance helps minimize image stretching or compression.Projector Lens and Zoom
The lens type and zoom settings influence how well the projector can adapt to uneven surfaces. Wide-angle or adjustable lenses are often preferable.Ambient Light
Bright rooms or uncontrolled light sources can exacerbate distortion and reduce image clarity on uneven walls.Projector Placement
Angled or off-center placement can increase trapezoidal distortion, making uneven walls more noticeable.
Methods to Project Clearly on Uneven Walls
Choose the Right Projector
Select projectors with high brightness and contrast to compensate for irregular surfaces. Projectors with lens shift and keystone correction offer flexibility in placement and alignment.Calculate Throw Distance Accurately
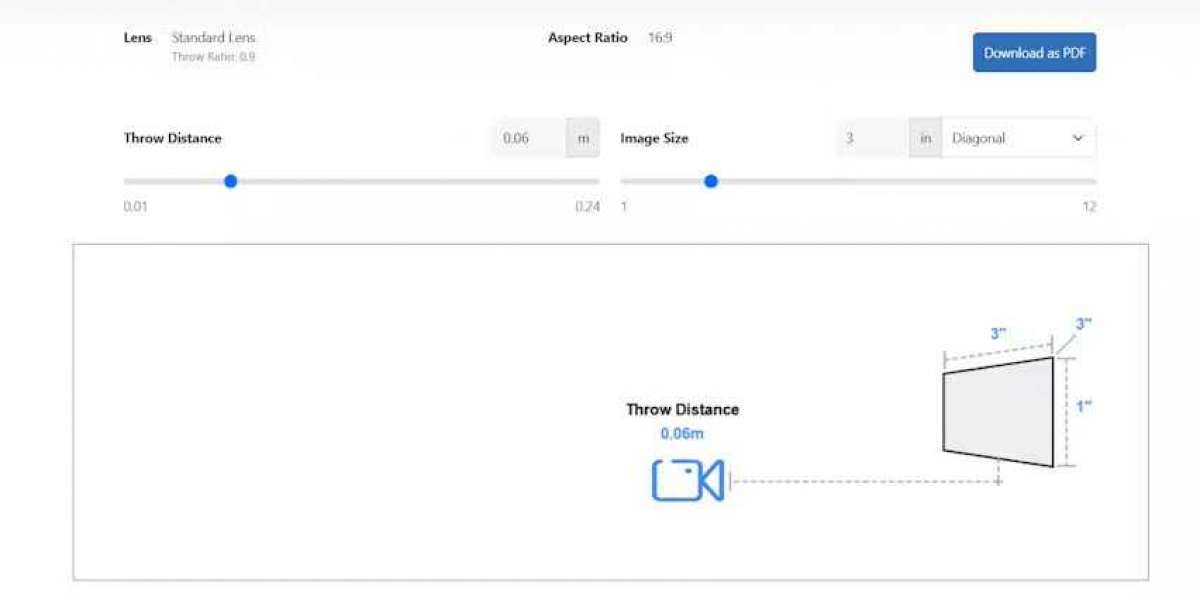
Using professional tools like XTEN-AV, you can determine the precise throw distance based on the screen size, wall dimensions, and projector specifications. Accurate placement reduces distortion caused by uneven surfaces.Use Lens Shift and Keystone Correction
Lens shift allows vertical and horizontal adjustments without moving the projector, helping to align the image with uneven areas. Keystone correction can digitally adjust trapezoidal distortion, although excessive use may reduce image quality.Consider a Projection Screen Overlay
For permanent installations, placing a projection screen over an uneven wall provides a flat surface for optimal clarity. This is ideal for home theaters, classrooms, or corporate spaces.Adjust Projector Angle
Position the projector perpendicular to the largest flat area of the wall. Even minor adjustments in angle can improve image alignment and reduce distortion.Use Multi-Projector Mapping
For large or highly irregular walls, multiple projectors can be blended and mapped to compensate for wall shape. This technique is common in events, exhibitions, and stage shows. XTEN-AV supports simulation and planning for multi-projector setups.Fine-Tune Zoom and Focus
Adjust the zoom to match the desired image size, and carefully focus to maintain sharpness across the image. On uneven walls, focus adjustments may need to be more precise.Optimize Ambient Lighting
Reducing ambient light or using blackout curtains improves contrast and clarity. Bright environments magnify the effects of wall irregularities.
Using XTEN-AV for Projection on Uneven Walls
XTEN-AV provides advanced tools to simplify projecting on uneven or challenging surfaces. Key features include:
Accurate Throw Distance Calculations
Input wall dimensions, screen size, and projector model to receive precise throw distances for optimal placement.Lens and Zoom Simulation
Digitally simulate lens shift and zoom adjustments to align the image with uneven surfaces before physically moving the projector.3D Visualization
Preview projector placement and projected images on a virtual model of the room, including wall irregularities, to identify potential distortion points.Multi-Projector Planning
Plan edge blending and image mapping for large or irregular surfaces, ensuring seamless projection across uneven areas.Professional Documentation
Export detailed plans including throw distances, lens settings, projector placement, and mapping guides for installers and team members.
Practical Applications
Home Theaters
Even in rooms with textured or imperfect walls, accurate throw calculations and lens adjustments ensure immersive viewing experiences.Corporate and Educational Spaces
Projecting on uneven walls in meeting rooms, lecture halls, or training centers requires precision to maintain clarity for presentations and instructional content.Event Venues and Art Installations
Projection mapping on textured walls, murals, or irregular surfaces is common in exhibitions, concerts, and stage shows. Advanced planning ensures perfect alignment and minimal distortion.Outdoor Projections
Uneven outdoor walls or facades can benefit from proper throw distance calculation, lens adjustments, and multi-projector setups to produce clear, vibrant images.
Tips for Successful Projection on Uneven Walls
Measure wall dimensions and surface texture accurately before planning the setup.
Use high-brightness projectors to overcome surface irregularities.
Simulate placement, lens shift, and zoom using XTEN-AV before physical installation.
Consider temporary or permanent screens for optimal flat surfaces.
Minimize ambient light to improve image clarity.
Test and fine-tune with actual content to ensure sharpness and alignment.
Conclusion
Projecting on uneven walls presents challenges such as distorted images, blurred edges, and uneven brightness. Addressing these issues requires careful selection of projectors, accurate throw distance calculations, lens adjustments, and, in some cases, multi-projector mapping.
XTEN-AV provides a professional solution for tackling projection on uneven surfaces. With precise throw distance calculations, lens and zoom simulation, 3D visualization, multi-projector planning, and detailed documentation, XTEN-AV ensures clear, aligned, and distortion-free projections on even the most challenging walls. Whether for home theaters, corporate rooms, classrooms, event venues, or outdoor installations, XTEN-AV helps AV professionals achieve optimal projection quality every time.
Read more: https://ekonty.com/blogs/425314/How-do-I-calculate-throw-distance-to-avoid-mistakes